The matrix convolution enables the user to apply customized effects to picture and z matrix data. Additionally, dotCube offers seven default effects and provides the possibility to store permanently your custom matrix presets.
Read on for detailed explanation about
Understanding the convolution matrix
Although the design of the convolution matrix may appear complicated, its adaption is very simple. The matrix contains white and gray matrix element boxes. Merely the white boxes are applied to the data.
So how do we convolute the matrix with the data?
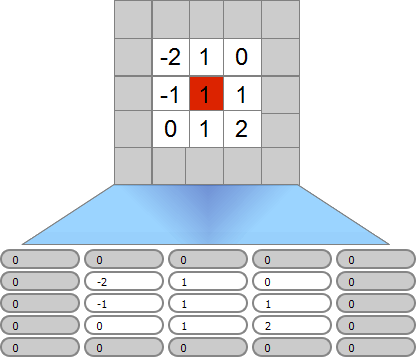
The simplest way to explain is the superposition of the matrix with the data pixels. If we want to process our custom effect to pixel "a" (the red colored pixel in the middle of the image above), we apply the sum of each neighbor pixel multiplied by a factor from the corresponding matrix element to pixel a.
E.g.: We want to apply the "emboss" effect with the matrix elements above to pixel a. So we start on top of the start pixel and go around clockwise:
processed pixel = 1⋅pixel(0,1) + 0⋅pixel(1,1) + 1⋅pixel(1,0) + 2⋅pixel(1,-1) + 1⋅pixel(-1,0) + 0⋅pixel(-1,-1) - 1⋅pixel(-1,0) - 2⋅pixel(-1,1) + 1⋅start pixel.
How to proceed at the image borders, see handling of border pixels.
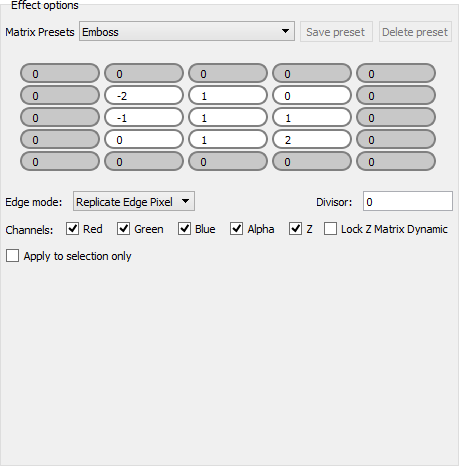
Click on a matrix element box to insert a value. All element boxes of the same square will change their color to white and contribute to the matrix convolution.
After you have modified the matrix elements, you might store the matrix settings. Click on the button "Save preset". The save dialogs prompts a preset name. After the preset is saved, you can select your preset from the "Matrix presets" bar.
Select your favorite preset from the "Matrix preset" bar. The convolution matrix will be filled with the associated factors.
The effect compares a current analyzed pixel with its neighbor pixels. At the image borders the missing neighbor pixels can be handled in two different ways:
The matrix convolution effect can be applied to picture and / or z matrix data. Choose the channels you want to manipulate ("red", "green", "blue", "alpha" and "z").
The effect can be applied to the entire image or to a previously selected region. Uncheck or check the option "Apply to selection only".
The "Divisor" will be applied to picture as well as z matrix data. All processed data will be divided by this factor. If the divisor is set to "0", no divisor will be applied.
The "Lock z matrix dynamic" will hold the range of the z matrix constant. Therefore, the convolution matrix will modify the z matrix within its range and thereby change the contrast of your image. But the z range remains unchanged.
The execution of the function may be started by pressing two different shortcut keys:
For more shortcut keys see our detailed list.