The edit object tool helps you to manage evaluated objects. You might modify their graphical representation as well as extract object property values. Because of the basic concept in dotCube: "Every effect or function will be applied to any selected item" you have to select the appropriate options in the "On other selected images..." menu when working with multiple images.
Select
Read on for further details:
The edit object tool enables you to extract numeric results from previously found objects. Once an object is found, its coordinates are stored in the object layer of the corresponding image. As a consequence, any object property of your interest can be determined by the edit object tool in future analysis processes.
The edit object tool provides access to properties and pixels of previously calculated objects. To determine object properties and insert them into a table, select the "List properties" option. The maintenance button on the right opens the object properties dialog which asks you how the data should be arranged and which properties should be listed. If some object properties were not yet calculated, they are determined from the edit object tool. In this way, you are able to work with the entire object properties set no matter how many properties were originally determined when the objects were found.
You can obtain pixels of previously found objects by the "List pixels" option. Select this option and click on the demanded object. The edit object tool displays a table containing
With the help of the sort functions of the dotCube table section, you are able to extract object pixels with distinct properties like border or skeleton pixels.
Every object gets automatically an ID. This ID is a unique number within the image where the object is found. The uniqueness is crucial because object data should not be mixed up. The edit object tool provides a dialog which enables you to change the ID of any object. If you choose a already used ID dotCube will automatically rename the other object because of the crucial uniqueness.
To change an ID of a single object, select the "Change id" option and click onto an object of a selected image. The change ID dialog asks for a new ID.
If you would like to unite multiple objects and allocate a distinct ID, the following process is the way to go:
The edit object tool enables you to select or deselect object pixels.
To select pixels of an object, choose the "Select pixels" option and click onto an object.
To deselect pixels of an object, choose the "Deselect pixels" option and click onto an object.
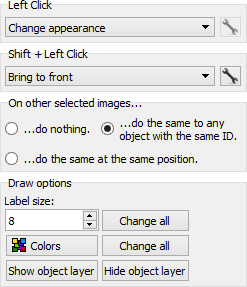
The edit object tool provides several possibilities to change the objects' colors, label size, visibility statuses, z order as well as their plain existence. While the "On other selected images..." options box governs the treatment of other selected images, the "Draw options" box gives you the possibility to apply your changes to one or all objects of the current images. Afterwards, other selected images are treated like in the "On other selected images..." options box stated.
The color and label size options might be applied to a single or each object:
The show and hide options of objects might be applied to a single or each object:
Select the "Delete" option and click onto an object to delete this one from the image and thereby from the object layer.
Select the "Bring to front / back" option and click onto an object to set this object in front or behind any other object in the current image.